Posts

Showing posts with the label Poseidon

Poseidon - Finishing

Image
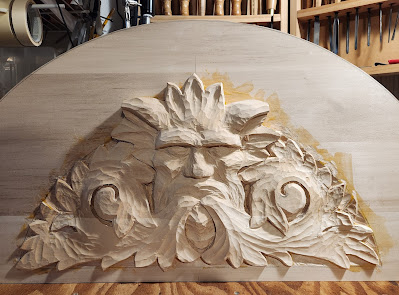
  Finishing the wood carving. First, I apply three coats of Enduro-Var. Enduro-Var is a water based urethane made by General Finishes. This seals the wood and provides a slight amber color. Next, I use Shaker maple tinted General Finishes water based stain to add color and depth. This is a meticulous process of brushing on and wiping off the stain to get the desired color and shading effect. The edge is stained slightly darker. The banner will overlap the edge and it will look better this way, if  seen from the side. The banner was sealed with a water based sanding sealer. Then, I applied as many coats of acrylic paint as it took to get an even black while still being able to tell that it is wood underneath. It took many coats of gold in the lettering followed by some touch-up of the black around the edges of the letters. Once the point was done, I applied three coats of General Finishes water based, clear, polyurethane top coat with a satin finish. After carefully measuring the positi

Poseidon - Carving Final Details

Image
  The carving of the face is completed. Here we see the refinement of the wind. With the shape just right, there is a lot of undercutting to create the strong shadows and visually separate the wind from the concave background. The undercutting is done and the background surface is cleaned up. To create the effect of a deeper, darker background once the finish is applied, the concave background is stippled. Here is a close up of the stippling effect on the background. Next up, carving the letters on the banner that will go over the carving. The lettering is done and here is the banner temporarily clamped to the carving to get a good look at how it will go together.    

Poseidon - Refining the Face

Image
 Quite a bit of work has gone into refining the face of Poseidon. For reference, the below this latest photo is one of how the same part of the carving looked at the time of the last post.  All of the progress posts for the Poseidon carving can be found at www.texaswoodcarving.com/search/label/Poseidon .

Poseidon - Shaping Things Up

Image
 Shaping things up on the Poseidon carving. We are getting close to refinement and details.

Poseidon Rough Out Continued

Image
  A quick updated on the Poseidon carving. Continuing to rough out the face and surrounding forms.      

Starting Poseidon Rough Out

Image
  The fun begins. Creating lots of wood chip as we start to go from wood slabs towards carved form. Here the wind areas on either side of the face are getting pushed back. With all this wood being cut away, it would be a shame for it to go to waste. The solution? Mulch. This way the wood can return to the earth and help the garden grow without raising land fills. So, here we are so far. You can start to see the forms taking shape.

Poseidon Glue Up

Image
  Gluing the Poseidon face and wind to get enough depth for the carving. After measuring the right alignment a few times, I apply Titebond glue and hold the layers in place with a couple of clamps. Once pressure is applied, the layers may want to slide a little bit out of place. To help prevent this, I put in a couple of screws to keep it from slipping. The screws are placed in spots that will be carved down low enough that the holes will disappear. Once the placement is secure, we need lots of pressure. The spots where the clamps press the wood on top will be carved away. Wood blocks or strips are used on the back to protect the wood from the clamps. After over 24 hours passed, the clamps are removed and carving can begin.

Poseidon Cutout

Image
This is the first post for a new carving featuring a relief of Poseidon. Here is the design sketch. To get started, we need some glued-up slabs of two-inch basswood.  The carving will be deeper than two inches. I will cut out the raised central area and banner to glue to the desired depth. So, I need to layout the shapes that will be needed for the layers. Here is a tiled enlargement to help get the approximate placement on the slabs. To help get accurate arches, I'm using a string tied to a screw at the center. The length of the string is adjusted to the radius of each concentric arch. Here is one of the basswood slabs with the pattern drawn on. Time to go to the Dallas Makerspace to cut the pieces on the band saw. The pieces are rough cut and laid out to get an idea of how it will go together. Next up, gluing the central raised area to the background. Stay tuned.